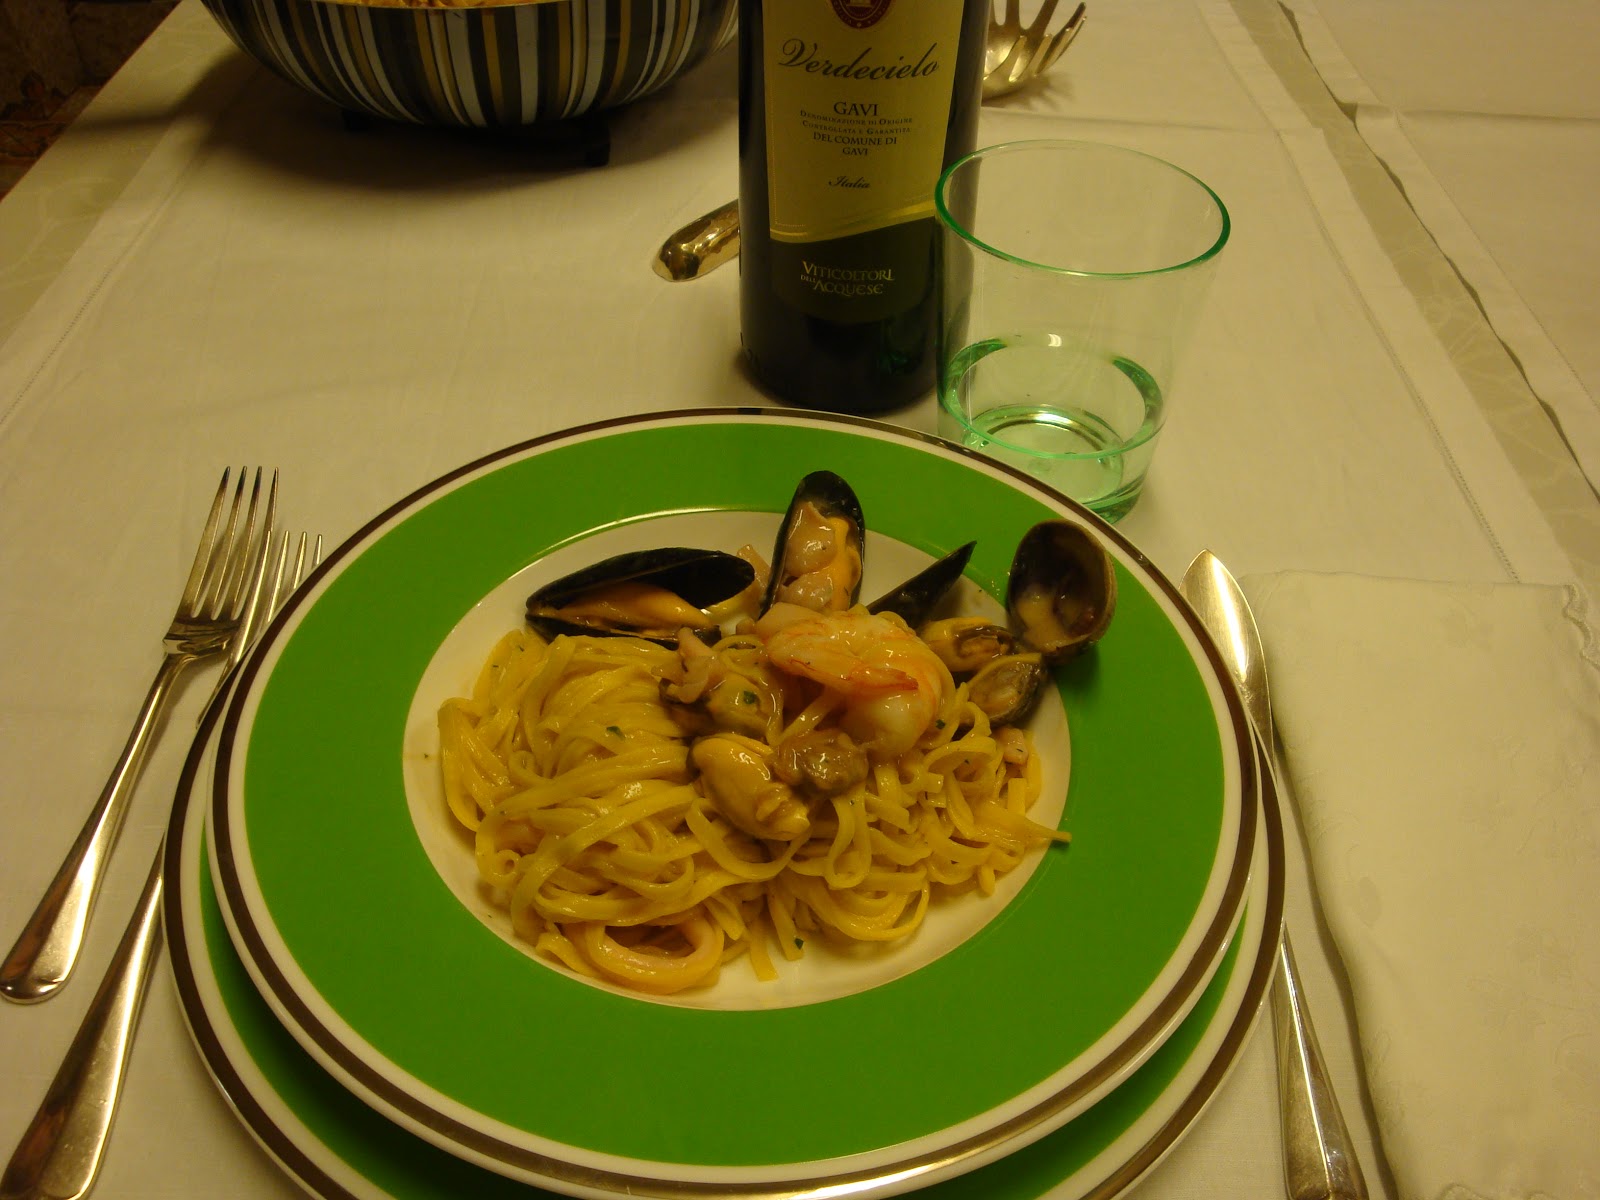
Che cosa bolle in pentola??? Questa è una ricetta abbastanza classica ma laboriosa, che include una piccola variante, una di quelle idee che vengono mischiando i basici della "grande cucina" a cui tra l'altro volevo mettere il marchio registrato... (ma questo è un altro discorso) che però, spiegata passo passo come abbiamo cercato di fare, chiunque possa riproporre per una cena di sicuro successo.
Gli ingredienti proposti sono tutti freschissimi, se deciderete di usare le confezioni di frutti di mare surgelate però, la variante non si potrà fare. La variante non si potrà fare anche nel caso in cui siate delle persone schizzinose, ci si deve sporcare un po' le mani. Oppure, potrete usare dei guanti.
Come dicevo, abbiamo cercato di spiegare ogni passaggio della realizzazione del piatto, quindi non solo con le foto ma anche con i video. Spiegare come si toglie l'intestino ai crostacei è più difficile che farvelo vedere direttamente. Però se siete amanti come me di gamberi, gamberetti, mazzancolle e affini quello diventa un passaggio fondamentale!
L'importante, per fare ricette che richiedono diversi passaggi e diversi tempi di cottura, è
l'organizzazione. Si, dovrete accertarvi di avere il tempo necessario per dedicarvi solo alla preparazione del piatto. Siate svizzeri! Niente intermezzi facebookiani perchè se la seppia cuoce di più diventa gomma americana oppure vi ritroverete a esservi dimenticati di togliere il bisso alle cozze... vabbè un pochino di verdura che sarà mai! Io consiglio di seguire i vari passaggi che verranno proposti. Poi, fate vobis! Buon'avventura!
Ingredienti:

- Tagliolini (80-100 gr. è la porzione per persona, se come noi, mangiate la pasta come unico piatto magari 20 gr. in più)
- 1/2 kg. di Vongole (possibilmente italiane)
- 1/2 kg. di Cozze (possibilmente italiane oppure francesi)
- 1/2 kg. di Moscardini ( oppure uno grosso)
- 2 o 3 Seppie
- 1/2 kg. di Mazzancolle o Gamberoni
- olio e.v.o.
- 30 gr. di burro (burro? nel pesce? sì è per la variante)
- 1/2 bicchiere di vino bianco ( o cognac al posto del vino)
- 30 gr. di Farina
- Prezzemolo q.b.
Fuoco alle Polveri!
Come prima cosa, uscite, andate a farvi una bella passeggiata con la vostra lista degli ingredienti e recatevi dal vostro "pesciarolo" di fiducia il giorno in cui sapete che gli arrivano le consegne.
Tornate subito a casa e calcolatevi il tempo a disposizione: dovrete far spurgare le vongole dalla loro sabbia. Questo non è difficile ma le vongole vogliono il loro tempo: mettetele in una ciotola grande, dove sul fondo avrete posto un piattino e aggiungete acqua molto fredda e tanto sale grosso, dopodiché, ponetela nel frigo per circa 3 - 4 ore. Il piattino sul fondo della ciotola servirà da divisorio fra la sabbia e la vongola spurgata, non la riassorbiranno. Ritrovarsi fra i denti una vongola alla sabbia non è per nulla gradevole!

Passato il tempo necessario, risciacquatele sotto acqua fresca corrente, strofinandole un pochino, eliminate quelle rotte (Ricordatevi che sono comunque ancora vive. Eh si. Più di una volta è capitato che guardandole mi abbiano "sputacchiato" addosso acqua. ) .
Il giusto passaggio è quello che ripropongo in fotografia:


Sollevare il piattino

Le nostre erano già abbastanza pulite


Togliere l'acqua dalla ciotola e sciacquarla, sciacquare anche le vongole strofinandole fra loro e rimetterle nella ciotola con acqua fredda.
Ora invece è il momento delle cozze, le cozze possono presentare bisso e denti di cane, armatevi di pazienza e di un buon coltellino però mi raccomando, attenzione a non tagliarvi!
Per prima cosa mettete le cozze nella stessa ciotola delle vongole con acqua bella fredda e corrente


Eliminate quelle che sono aperte.
e procedete come segue:
le nostre erano abbastanza pulite comunque potete anche chiedere di dare una prima pulita in pescheria o dove comprate in genere il pesce, almeno toglieranno i denti, poi comunque controllatele lo stesso.
Una volta pulite, lasciatele da parte nella stessa ciotola delle vongole con acqua sempre molto fresca.
Ora, visto che avete già le mani bagnate, passate alle mazzancolle: sgusciatele e togliete il filetto nero, ma non buttate via nè i gusci, nè le teste, vi serviranno dopo per inziare a preparare la bisque che è un fumetto che servirà come base per... beh poi vedrete... (per approfondimenti sulla bisque cliccate su quella sottolineata). Ah, vi serve il solito stuzzicadente!
Fatto questo, iniziamo ad usare i fornelli.
Passiamo all'inizio della bisque che sarà poi la base per fare una vellutata che sarà la cremina legante del nostro sughino di pesce. Praticamente è come se fosse una besciamella, ma senza latte poichè verrà usato questo fumetto di pesce (l'inizio della bisque, perchè quella vera richiede poi dei passaggi differenti). Io quindi l'ho ribattezzata la... Testamella!! Vedendo il prossimo video capirete meglio.
In caso non abbiate crostacei freschi o vi faccia orrore l'idea di
schiacciare le teste dei crostacei beh, usate della comune panna da
cucina (Ma non sarà lo stesso! E poi alla fine non differisce molto da un brodo di carne o di pollo). La quantità d'acqua usata è mezzo litro.
Perfetto, ora è il momento di far aprire i molluschi.
Metteteli in una padella capiente, con un filo d'olio, un po' di prezzemolo e un bicchiere di vino. Fuoco alto e cuoceteli per 5/6 minuti, coperti con un coperchio. Non scoperchiate in cottura, perchè il vapore aiuta a far aprire i molluschi.
Ora che abbiamo occupato due fornelli, dedichiamoci a seppie e moscardini. N.B. noi avevamo un unico moscardino grande, che avrà anche una cottura differente, ossia ci metterà di più, altrimenti dovrete tenere conto che solitamente per quelli piccoli la cottura è molto minore (10 minuti).
Ma prima dobbiamo pulire anche loro.
Pulite seppie e moscardino controlliamo come va il fumetto
A bollore, abbassiamo il fuoco e lasciamo cuocere per mezz'ora.
E tagliamo le mazzancolle, magari lasciandone una intera per la presentazione a tavola, oppure, se ne avete abbastanza, una intera a commensale.
 Sicuramente ora i molluschi saranno aperti da un pezzo, lasciateli raffreddare un po' se no vi scotterete per sgusciarli. Ok riposatevi un pochino. Anche il vostro fumetto sarà pronto quindi ora c'è il momento della "filtrazione" sia dell'acqua di cottura di cozze e vongole sia per il Brodo di Teste.
e procedete come segue:
le nostre erano abbastanza pulite comunque potete anche chiedere di dare una prima pulita in pescheria o dove comprate in genere il pesce, almeno toglieranno i denti, poi comunque controllatele lo stesso.
Una volta pulite, lasciatele da parte nella stessa ciotola delle vongole con acqua sempre molto fresca.
Ora, visto che avete già le mani bagnate, passate alle mazzancolle: sgusciatele e togliete il filetto nero, ma non buttate via nè i gusci, nè le teste, vi serviranno dopo per inziare a preparare la bisque che è un fumetto che servirà come base per... beh poi vedrete... (per approfondimenti sulla bisque cliccate su quella sottolineata). Ah, vi serve il solito stuzzicadente!
Fatto questo, iniziamo ad usare i fornelli.
Passiamo all'inizio della bisque che sarà poi la base per fare una vellutata che sarà la cremina legante del nostro sughino di pesce. Praticamente è come se fosse una besciamella, ma senza latte poichè verrà usato questo fumetto di pesce (l'inizio della bisque, perchè quella vera richiede poi dei passaggi differenti). Io quindi l'ho ribattezzata la... Testamella!! Vedendo il prossimo video capirete meglio.
Perfetto, ora è il momento di far aprire i molluschi.
Metteteli in una padella capiente, con un filo d'olio, un po' di prezzemolo e un bicchiere di vino. Fuoco alto e cuoceteli per 5/6 minuti, coperti con un coperchio. Non scoperchiate in cottura, perchè il vapore aiuta a far aprire i molluschi.
Ora che abbiamo occupato due fornelli, dedichiamoci a seppie e moscardini. N.B. noi avevamo un unico moscardino grande, che avrà anche una cottura differente, ossia ci metterà di più, altrimenti dovrete tenere conto che solitamente per quelli piccoli la cottura è molto minore (10 minuti).
Ma prima dobbiamo pulire anche loro.
Pulite seppie e moscardino controlliamo come va il fumetto
E tagliamo le mazzancolle, magari lasciandone una intera per la presentazione a tavola, oppure, se ne avete abbastanza, una intera a commensale.
Questi passaggi fateli molto lentamente, soprattutto per l'acqua di cottura dei molluschi. Alle teste date una schiacciatina...
Nella stessa pentola in cui avete fatto schiudere i frutti di mare, mettete un fondo di olio, cipolla o aglio, peperoncino e iniziate la cottura del moscardino se è grande, altrimenti delle seppie se avete i moscardini piccoli
Una volta avviata questa cottura, facciamo la "Testamella"che ripeto, nient'altro è che una vellutata con il brodo ricavato dal carapace delle mazzancolle.
Quindi, fate sciogliere il burro a fuoco lento e versateci la farina, mescolando con una frustina, finchè la farina diventi brunita, dorata, e abbia perso tutta l'umidità ( si ritira quasi). Questa fase si chiama roux. Dopodichè togliete il pentolino dal fuoco e iniziate a versarci il brodo, sempre mescolando togliete tutti i grumi. Rimettete sul fuoco, piano piano si addenserà e a ripresa del bollore la testamella è pronta. Lasciatela da parte.
Ora possiamo continuare con il nostro sughetto aggiungendo le seppie


e un mestolino di acqua di cottura di cozze e vongole
sgusciare le vongole e le cozze tenendone qualcuna per il piatto di portata
 e aggiungerle al sughetto
 Stessa cosa con le mazzancolle
sgusciare le vongole e le cozze tenendone qualcuna per il piatto di portata


Mettere sul fuoco l'acqua della pasta, una volta che bolle, prima di mettere i tagliolini aggiungere nell'acqua un filo d'olio. Permetterà alla pasta (fresca o all'uovo) di non attaccarsi e completate il vostro sughino così:
Spero che questa ricettina vi possa piacere e se non sono stata chiara su qualche passaggio, scrivetemelo e vi risponderò!
Buon appetito!!!

p.s. Sig.na Lunankara questa la puoi fare pure tu. Credo che gli ingredienti si trovino!!! :D